5 Best Practices to Prevent SSH Brute-Force Login Attacks in Linux
Introduction
Typically, SSH-enabled servers make for easy targets for brute-force attacks. The ongoing development further increases the risk of intrusion by hackers of new software tools and bots for automating brute-force attacks.
This manual will look at strategies to protect your SSH servers from brute-force attacks on Linux distributions based on RHEL and Debian derivatives.
1. Disable SSH Password Authentication and Enable SSH-Key Authentication
Username/password authentication is the standard authentication technique for SSH. But as we have seen, brute-force attacks can be used to target password authentication systems. Implementing key-based SSH authentication, in which authentication is made possible via public and private SSH key pairs, is advised to be safe. While the public key is copied to the server, the client’s private key stays on their computer.
During SSH key authentication, the server verifies whether the client PC has the private key. A shell session is created, or the command supplied to the remote server is executed if the check is successful. You may find detailed instructions for configuring SSH key-based authentication on our website.
Your server is still vulnerable to brute-force assaults even after configuring Key-based authentication because password authentication is still in use. This has to be turned off.
Edit the SSH configuration file’s default settings as a result.
sudo vim /etc/ssh/sshd_config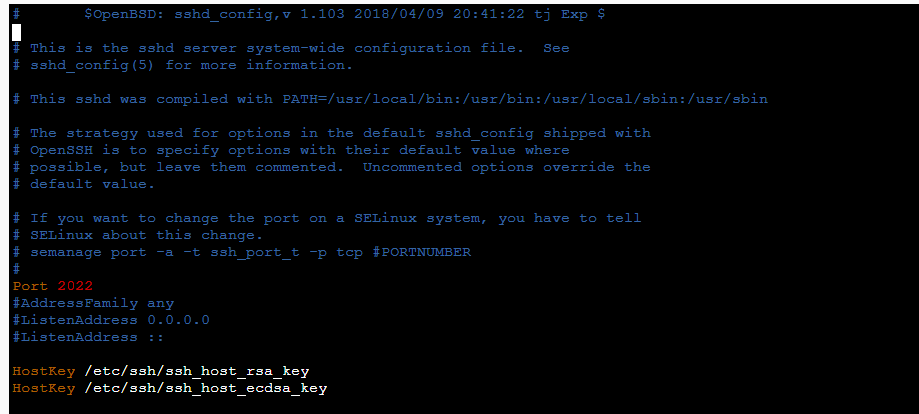
As shown, change the PasswordAuthentication parameter to no. To apply the modifications, save the file and reload SSH.
sudo systemctl reload sshTo apply the modifications, save the file and reload SSH.
sudo systemctl reload ssh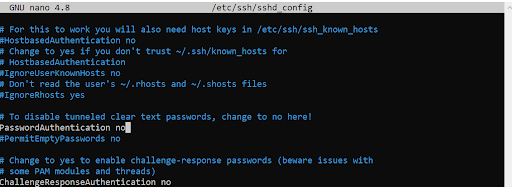
2. Use the intrusion prevention tool Fail2ban
Fail2Ban is a popular Python-based Intrusion Prevention System (IPS). Development has continued since its inception as an open-source Python product in 2004. it has been a success in the development community.
Fail2Ban is intended to assist servers of all types in avoiding brute-force attacks. As we’ll see later, it accomplishes this by utilizing various adjustable features. Before you contemplate using Fail2Ban on your server, you should know a few things. While the application is well-known and is used on servers all around the world, there are a few things it does not perform that you may anticipate or require:
The software does not protect servers from distributed brute force assaults, despite its primary objective of protecting against brute force attacks.
- Fail2Ban does not support applications that use non-standard APIs.
- Fail2Ban employs a log-monitoring strategy to avoid server invasions.
- Unless the user specifies otherwise, log files for Apache servers usually are discovered and added to the list of text files to monitor.
Fail2Ban is a straightforward IP address blocker that can be used on servers at its most fundamental level. Administrators can manually add unwanted IP addresses to a list of permanent connection bans. IPv4 and IPv6 addresses are both supported. Administrators can also designate “unwanted behaviors” and restrict IP addresses depending on violations of this rule list.
3. Built-in safeguards
Millions of IP addresses could attempt to connect to a server during a DDoS assault. Of course, Fail2Ban works to prevent DDoS assaults by prohibiting blocks of IP addresses from flooding a server; however, these bans are only temporary by default.
As a server administrator, it may be tempting to permanently ban all IP addresses associated with the attack. However, no software can completely isolate only bad IP addresses, and you’d likely end up permanently blocking a portion of the server’s user base if you did. Thus, this safeguard should rarely be disregarded.
Defining custom actions
When an IP address is detected breaking a rule or attempting to connect when it is forbidden, Fail2Ban will take whatever action the administrator has specified. These can be selected from the program’s options menu, such as adding it to a firewall’s “deny” list. Furthermore, more complex procedures can be executed using any custom Python script of the administrator’s choice.
What is the default support?
- Apache
- Lighttpd
- sshd
- vsftpd
- qmail
- Postfix
- Courier Mail Server
Fail2Ban mechanism
Fail2Ban uses a simple set of procedures to swiftly determine whether to take action and, if so, what action to take upon each server connection. A new server connection log entry indicates that a connection is being attempted. Fail2Ban identifies and examines the connection’s parameters instantly.
When a connection request is received, it is passed through a “filter” to evaluate whether the behavior is defined as undesirable or the address is disallowed. If it matches a filter, there is an “action” that contains the steps that must be followed. When a connection request encounters a filter and causes an action that results in a ban, the IP address is “jailed.” The jail.conf file specifies what happens when an IP address is “jailed.”
4. Maximum SSH Authentication Attempts Cannot Exceed
Limiting the amount of SSH login attempts is another simple technique to protect your server from brute-force assaults. This is set to 3 by default, but if it is set to a higher value, set it to no more than 3 connection attempts.
For example, to limit the number of connection attempts to three, set the MaxAuthTries option to three as shown.
MaxAuthTries = 3Save the changes and restart the SSH service.
sudo systemctl reload ssh5. Implement TCP Wrappers to Regulate Client SSH Access
An open-source host-based Access Control List (ACL) system called TCP Wrapper limits TCP network services based on hostname, IP address, network address, and other factors. It determines which host should have access to a particular network service. A Dutch scientist and programmer named Wietse Zweitze Venema created TCP Wrapper in 1990 at the Eindhoven University of Technology. After maintaining it till 1995, he released it in 2001 under the BSD License. This short guide will describe how to use TCP Wrappers to limit access to Linux servers.
Please be aware that TCP Wrapper cannot wholly replace a properly configured firewall. It merely serves as a useful addition to improving the security of your Linux system. Using it along with a completely configured firewall and other security tools and mechanisms is advised.
Install TCP Wrappers
Most Linux operating systems’ official repositories have TCP Wrappers. It can be installed as depicted below, depending on your chosen Linux distribution.
On YUM-based systems:
sudo yum install tcp_wrappers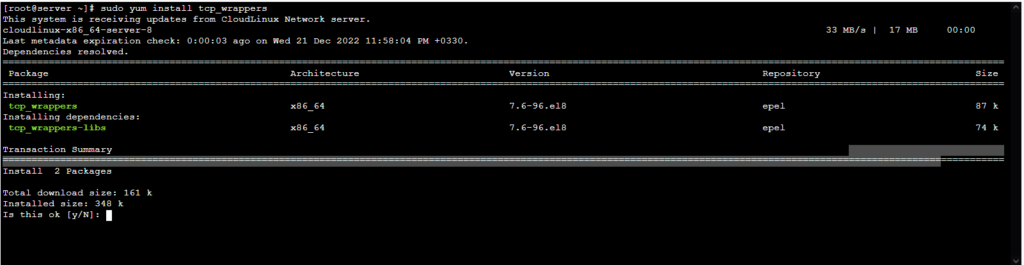
On SUSE/openSUSE systems:
sudo zypper in tcp_wrappersConfiguration
TCP Wrappers use two configuration files to implement access control. /etc/hosts.allow and /etc/hosts.deny.
These two access control list files determine whether or not a particular client is permitted access to your Linux server.
The /etc/hosts.allow file
The list of sites or networks that are permitted or disallowed is contained in this file. It implies that we can both permit and disallow connections to network services by specifying access rules in this file.
The /etc/hosts.deny file
The list of hosts or networks that are prohibited from accessing your Linux server is contained in this file. The ‘deny’ option can configure the access rules in /etc/hosts.allow file as well.
The typical syntax for an access rule is as follows:
daemon_list : client_list : option : option ...- daemon_list -: A network service’s name, such as SSH, FTP, or Portmap.
- clients_list -: A list of valid hostnames, IP addresses, or network addresses separated by commas.
- Options -: An optional action that indicates what should happen when a rule is matched.
Both files have the same syntax.
Remember the following rules:
Before using TCP Wrappers, you must first understand the following important rules. Please remember that the TCP Wrapper only consults these two files (hosts.allow and hosts.deny).
In both files, just one rule per service is permitted (hosts.allow and hosts.deny).
The sequence of the rules is crucial. Only the first matching rule for a particular service will be considered. The same rules apply to both files.
If there are no matching rules for service in either file or if neither file exists, remote hosts are permitted access to the service.
Any modifications to either file will take effect instantly without the need to restart the network services.
The standard recommendation is to block all inbound connections so open the /etc/hosts.deny file.
sudo vim /etc/hosts.denyAdd the line that follows.
ALL: ALLSave the modifications and close the file.
Then open the /etc/hosts.allow file.
sudo vim /etc/hosts.allowAs demonstrated, configure the hosts and domains that can connect to the server via SSH. In this example, we are permitting only two remote hosts (5.89.162.46 and 5.68.145.32) to connect to the server and denying all others.
sshd: 5.89.162.46 5.68.145.32
sshd: ALL: DENY
Save the modifications and then close the configuration file.
Conclusion
The four SSH hardening strategies we have discussed should get you a considerable step closer to ensuring the safety of your remote connections. After putting into practice the techniques outlined in our article on the 5 best practices for securing SSH and in this more in-depth look at the topic, you can be confident that your secure shell access is, in fact, secure.