Linux Crontab Tutorial
Crontab Introduction
A daemon’s name is Cron. Daemons are utility programs in Linux that operate in the background, monitoring and carrying out activities in response to triggering events and programmed schedules. Daemons can also be used to automate repetitive tasks.
The origin of the term “cron” can be traced back to the Greek word “Chronos,” which can be translated as “time.” Cron is a daemon that operates according to a set timetable or calendar, as this indicates.
A long-running piece of software known as the cron daemon is a system tool responsible for executing commands at specific dates and times. When using cron daemons, you can schedule computer activities as one-time events, occasional events, or as jobs that are scheduled repeatedly and on a regular basis.
Cron scheduling is useful for many businesses because it can automate repetitive operations, edit databases, data, or files, send bulk email messages, and conduct administrative tasks on a predetermined schedule.
The scheduling syntax that cron utilizes is also often used by software that does not run on operating systems. An example is Zuar’s Mitto data pipeline solution. Mitto can automate a wide range of processes by utilizing cron scheduling, including manipulating data within data warehouses, pulling data from other software, and many more.
The term ‘Cron Table’ can be abbreviated to ‘Crontab,’ a component of Cron. It is a file containing the cron schedule that needs to be executed and the commands used to automate operations and activities. When you make a new cron job, its information will be saved in the crontab file.
System administrators can only modify the system crontab file. However, many administrators are supported by Unix-like operating systems. Everybody can make a crontab file and add commands to it anytime.
Users may automate system upkeep, disk space monitoring, and backup scheduling with cron jobs. Cron jobs are ideal for servers and other machines that operate continuously because of their nature.
Cron jobs can be useful for web developers even though system administrators often utilize them.
As a website administrator, you could, for instance, set up three cron jobs: one to check for broken links every Monday at midnight, one to back up your site every day at midnight automatically, and one to delete the cache of your site every Friday at noon.
Crontab Interface Commands/Options
Here are the most popular options for you to deal with within Linux:
- Crontab -e: To modify the current crontab, access it (or create one if it does not yet exist)
- Crontab -l: Show the current list of cron jobs in crontab.
- Crontab -i: A more secure method of deleting your crontab file than the -r command because it necessitates a yes-or-no decision
Let’s imagine you want to edit the crontab, for instance. In Linux, open the command prompt and type “crontab -e.” After pressing I to start the edit mode, type your schedule command.
The tool will automatically generate a new crontab file on your system if none are present. You can add, edit, and delete cron tasks using the crontab -e command.
You’ll need a text editor like vi or nano to modify a crontab file. You will be prompted to select the text editor you wish to use to modify the file when you first execute crontab -e.
Enter the following command to view a list of your system’s active scheduled tasks:
crontab -l
To display a list of crontab files for every user on your system, use the following command as a superuser:
crontab -u username -lBy entering the crontab command below, you can also quickly edit the scheduled tasks of other users:
sudo sucrontab -u username -eAdd the string “sudo su” at the beginning of the command to grant yourself root access. This command is one of those that root users can only run.
Last but not least, use the following command to clear up your crontab file of all scheduled activities and start over:
crontab -rAlternatively, the command crontab -r is equivalent to the following one, with the exception that it will ask the user a yes/no question before erasing the crontab:
crontab -iThe root user can add cron tasks to the etc/cron.d directory in addition to crontab. It works best when scripts for automatic installations and updates are being run.
Remember that the user adding cron jobs to this directory must have root access and follow run-part naming guidelines.
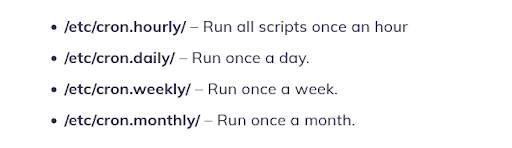
As an alternative, a root user can schedule the execution of their scripts by putting them in one of the following directories:
How to Create a CronJob on Linux
Let us imagine you want to edit the crontab, for instance. In Linux, open the command prompt and type “crontab -e”. After pressing I to start the edit mode, type your schedule command.
You must first be familiar with cron’s syntax and formatting to construct a cron job. Otherwise, it might not be feasible to set up cron jobs appropriately.
The five fields in the crontab syntax can have the following possible values:
- Minute: The hour and minute the command will run from 0-59.
- Hour: The hour the command will execute at, expressed as a 24-hour number between 0 and 23.
- Day of the month: The user-specified day of the month can be any number between 1 and 31.
- Month: The user-specified month they wish the command to execute, ranging from 1 to 12, or January through December.
- Day of the week: The day of the week on which command will execute; values 0 through 6 correspond to Sunday through Saturday. The number 7 in certain systems stands for Sunday.
Cron limitation
Cron has limitations, though, much like any other application, so bear that in mind before using it:
60 seconds is the smallest amount of time between jobs. You cannot repeat a task using cron at a rate of once per 59 seconds or less.
They are centered on a single computer. Cron jobs cannot be shared among numerous machines connected to a network. The scheduled tasks will, therefore, not be carried out if the computer executing cron fails, and the unfinished jobs can only be completed manually.
No auto-retry system Cron is made to run only at predetermined intervals. A job won’t execute again until the next time it is scheduled if it fails. Cron cannot handle incremental jobs as a result.
With these restrictions, cron is a great option for straightforward jobs that run regularly at least 60 seconds intervals.
Use the calendar function to set a one-time task for a later time.
Tip: Ensure that your script functions before establishing a Cron Job. Depending on your script, you can either execute the file over SSH or open it in your browser (via URL). For assistance, if your script is not working, speak with developers.
Cron Permissions
Users can be permitted or prohibited from using the system’s cron file by creating or altering the following two files:
- /etc/cron.allow: If cron.allow is present, it should have the name of the user who is to be allowed to use cron jobs.
- /etc/cron.deny: The user who wants to use cron jobs must not be listed in the file if cron.allow does not exist but cron.deny does.
Conclusion
It is a smart method to avoid overlooking crucial activities to set up automatically scheduled jobs.
System administrators and web developers may manage repeated work quite effectively with cron jobs. Simply insert the relevant commands and pick the appropriate execution time.
Use the proper syntax in the command line to set a cron job. As an alternative, you can use special strings to simplify the procedure. To ensure that only allowed users may access the cron file, do not forget to provide the appropriate permissions.
We trust that this article has provided you with a basic understanding of scheduling tasks using cron jobs. Please feel free to ask any questions in the comments area.
If you’d like to monitor your cronjob health, you can use Xitoring heartbeat monitoring on your Linux server.