Setup Secure FTP server on Linux using VSFTPD
Introduction
Have you ever worked away from home and realized that you left a critical document on your computer? The optimal method is to utilize an FTP server such as Very Secure FTP Daemon (VSFTPD).
You can install and configure an FTP server using VSFTPD on your Linux server by following the steps in this guide. With this server, you can safely transfer files to other computers.
Continue reading, and you’ll never have to worry about your files being held hostage on your home computer again!
The File Transfer Protocol, sometimes known as FTP, is a standard network protocol that sends and receives data to and from remote networks. Linux users have access to various open-source FTP servers to choose from. PureFTPd, ProFTPD, and vsftpd are the ones that have the most notoriety and are utilized the most frequently. We will install vsftpd (Very Secure FTP Daemon), a dependable, secure, and quick FTP server. In addition, we will demonstrate how to configure the server so that users can only access their home directories and the entire transmission is encrypted using SSL/TLS.
Although FTP is a highly used protocol, you should consider using SCP or SFTP instead if you want to transfer data in a more protected and expedient manner.
In this blog, we will use Ubuntu and similar Debian base distribution; however, any other Linux distribution should also work.
Installing VSFTPD on Ubuntu
The FTP server, VSFTPD, is compatible with Unix-like platforms but not pre-installed on those systems by default. Installing VSFTPD on Ubuntu follows a process that is analogous to the installation of other packages. Before beginning the installation of VSFTPD, you should begin by bringing your APT package manager up to date.
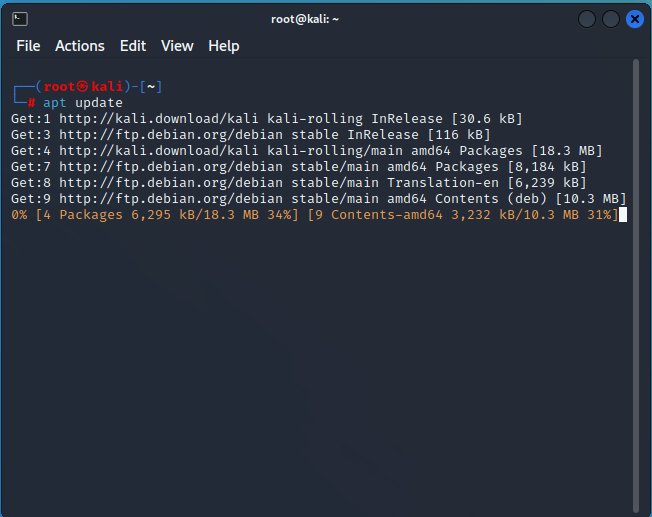
To update APT, type “apt update” into your terminal. In addition to updating the local package cache, this program collects package listings from the preset repositories.
After that, execute the “apt install” command seen below to set up VSFTPD on your computer. Additionally, this operation will download all of the FTP service’s necessary dependencies.
apt install vsftpd -yThe VSFTPD package is accessible by default on most contemporary Debian-based distributions. Therefore, you can install it without additional package repositories, leaving everything up to APT.
Run the systemctl command listed below to ensure that the VSFTPD service is active and correctly configured before concluding.
An output resembling the one below will be displayed, indicating that the vsftpd. service is running and actively accepting requests.
Config system to open ports for FTP client connections
You can now configure your firewall because the most recent version of VSFTPD is now installed. To add firewall rules to open ports for secure FTP client connections, you will use UFW, Ubuntu’s standard firewall configuration tool.
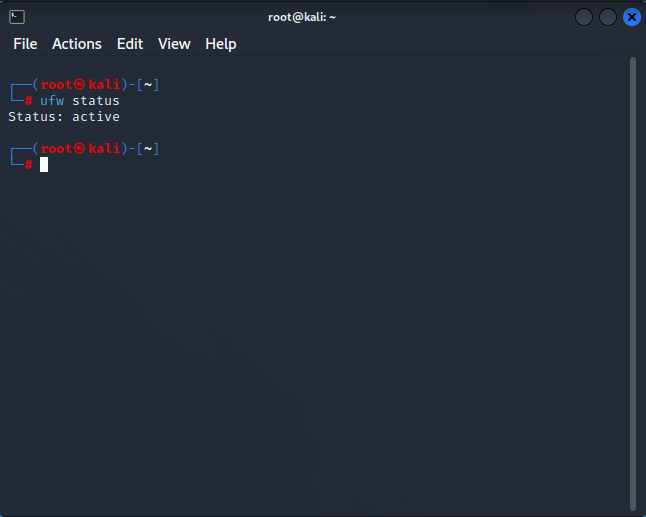
To determine which firewall rules are currently in effect, use the ufw status command.
sudo ufw statusAs you can see below, the firewall is operational but devoid of rules that normally permit connections.
After that, use the ufw to allow the command to tell the firewall to let all three ports through. FTP connections on ports 20, 21, and 990 are necessary for VSFTPD.
sudo ufw allow 20,21,990/tcp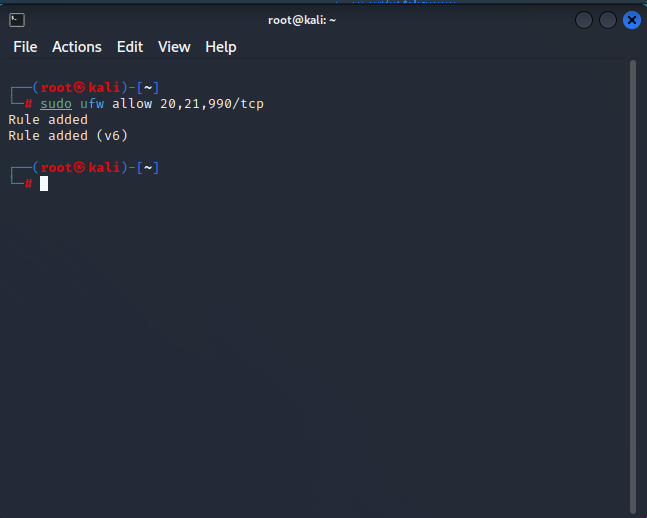
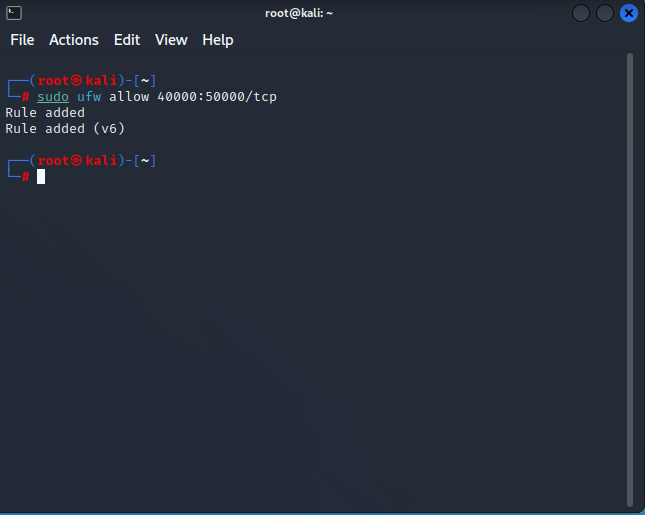
To open the 40000:50000 port range, enter the ufw command listed below.
sudo ufw allow 40000:50000/tcpThe 40000:50000 port range must be open for VSFTPD for FTP clients to connect to the server and send data in passive mode.
Finally, use the ufw status verbose command to check for faults and confirm that your firewall rules are active by running it.
sudo ufw status verbose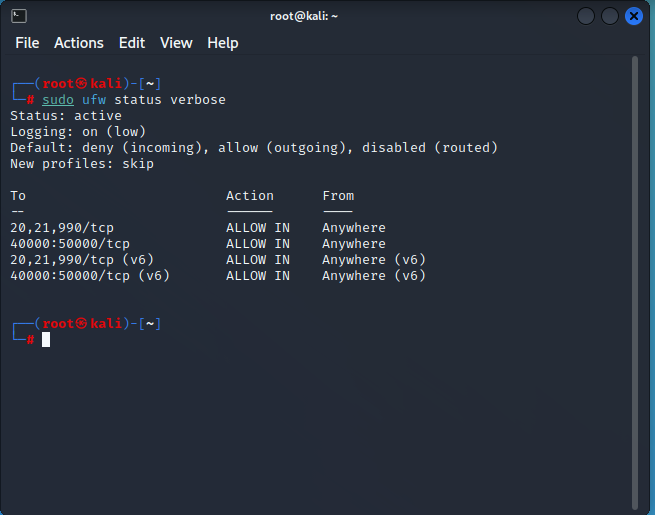
Steps configuring the VSFTDP server
Although the firewall has been successfully opened to traffic, you still need to set up your VSFTPD server before using it.
The primary configuration file for VSFTPD is located in /etc/vsftpd.conf. However, if you prefer to make changes on the fly, you can also configure your FTP server using other commands alternatively if you’d rather specify rules that aren’t listed in the configuration file.
Remove the # sign from the front of each directive to make it active while modifying the /etc/vsftpd.conf file.
To backup the original configuration file (/etc/vsftpd.conf/etc/vsftpd.conf.bak), use the sudo cp command following.
Any crucial configuration file should always be backed up before you mess around.
sudo cp /etc/vsftpd.conf /etc/vsftpd.conf.bakNext, use your preferred text editor and navigate to the file /etc/vsftpd.conf. In this demo, the configuration file is edited using nano.
sudo nano /etc/vsftpd.conf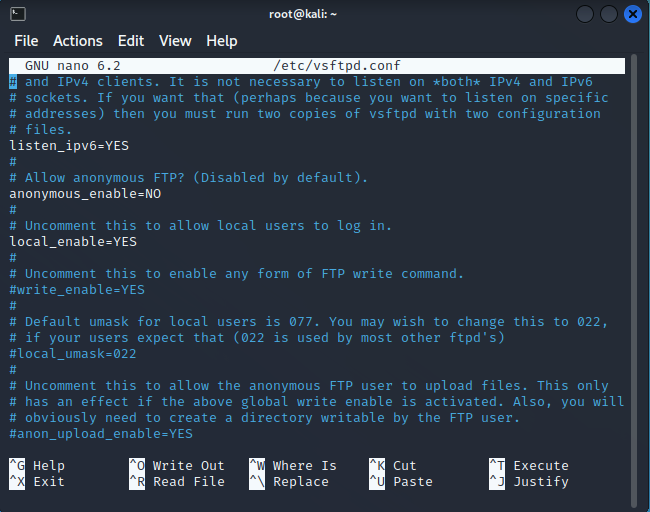
Search for and alter the value of the “anonymous enable” directive to “NO.” For open file sharing, anonymous users are frequently employed. That anonymous person shouldn’t be using your server, you know. It would help if you instead focused on making your FPT server secure.
To enable FTP file transfers for users who have accounts on your server, set the local enable directive’s value to YES. Only authorized users can log into your FTP server with this configuration.
To enable users to upload and save files to your FTP server, update the “write enable” directive to “YES.” Since it regulates who has access to the upload functionality, this directive is the most crucial one.
Since your FPT user shouldn’t run as root, change the “chroot local user” directive to “YES.” It is considerably safer to create a new, potentially privileged user for the FTP service to utilize (you will learn how to create a dedicated user later).
The FPT user will access all server areas, including the root directory if this directive is not enabled. This activity poses a serious security risk.
With this option, your user is restricted to the folders you designate (often the user’s home directory).
However, the write enable directive (step 4) will not function when the chroot local user directive value is set to YES since the “chroot() syscall” forbids writing access (when enabled).
Add the following directive to your vsftpd.conf file as a workaround so that the write enable directive will function regardless of the value of the “chroot local user” directive.
allowed_writeable_chroot=YESThe next step is to enable passive FTP connections by adding the following directives to your vsftpd.conf file.
For the passive FTP connection, VSFTPD can utilize any port over 1024 that isn’t already in use by another service. The port range you specified in the “Opening Ports for FTP Client Connections” section is used in this demonstration (step three).
pasv_min_port=35000
pasv_max_port=40000
To restrict access to the FTP server to just authorized users, add the following lines at the bottom of the vsftpd.conf file.
“userlist_enable=YES
# Add the user to the vsftpd.userlist to allow a specific user
# to use the system login account to access your FTP service.
userlist_file=/etc/vsftpd.userlist
# NO - anyone can log in with an anonymous account.
# YES - the user will be denied to login when their name exists in this file.
userlist_deny=NO
In order to apply the changes, save and close the vsftpd.conf file and then run the command below to restart your vsftpd server.
sudo service vsftpd restartCreating a dedicated user to use the FTP service
Your VSFTPD server is now configured, but using the FTP service will require a specific user rather than root. To make the directory easily accessible, you’ll build a directory inside the user’s home directory.
To create a new user, execute the adduser command seen below. Although this sample generates a user named user1, you are free to select any username you like. However, be careful not to replicate the user on other parts of your server.
sudo adduser user1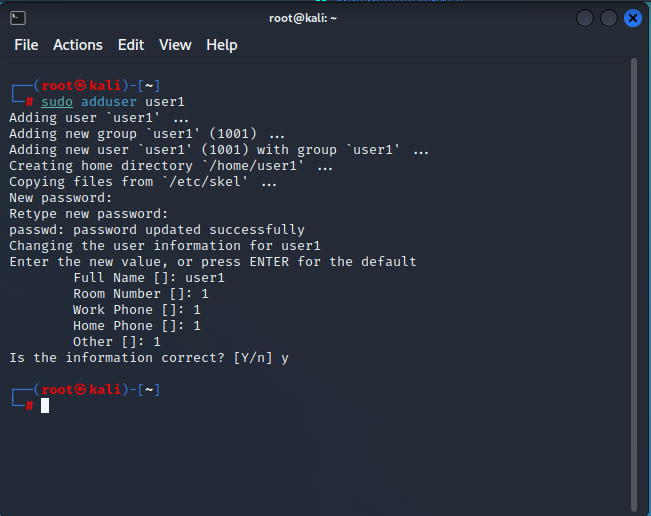
Give a strong password, and we’ll record it. This password will be required to access your FTP server.
Additionally, you must enter some information for the new user or leave the default information by pressing ENTER. To validate the user details, enter Y and then press ENTER.
Next, run the below command to add the user1 user to the vsftpd.userlist file.
As you may remember, when the userlist deny directive value is set to NO, this file indicates which users are permitted to log in via FTP. At this point, all other anonymous users will be banned access to your FTP server and only the data user will be able to log in.
echo "user1" | sudo tee -a /etc/vsftpd.userlist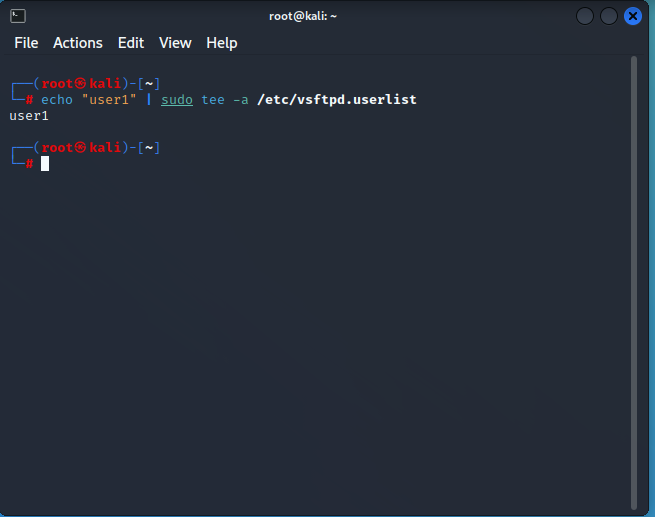
To properly set the permissions for the new /home/user1/ftp directory, issue the following commands.
The commands below enable access to and file transfers from the /home/ata/ftp directory for only your designated FTP user.
"# Sets the owner of the /home/ata/ftp directory to be nobody.
sudo chown nobody:nogroup /home/ata/ftp
# Ensures that only the owner (your FTP user)
# has write(w) access(a) to the /home/ata/ftp directory.
sudo chmod a-w /home/ata/ftp”Run the chown command to make your FTP user the owner and group of the /home/user1/ftp/upload directory (user1). The command also correctly adjusts the permissions for the directory /home/user1/ftp/upload.
sudo chown user1:user1 /home/user1/ftp/uploadTo generate a simple test file with user1.txt, use the echo command below.
The command below adds some content (vsftpd test file) to a new text file called user1.txt in your FTP directory.
echo "vsftpd test file" | sudo tee /home/user1/ftp/upload/user1.txtYour FPT server is now completely configured, and users can connect to it.
Connecting to the FTP server
After creating a dedicated FTP user and configuring their settings, it is time to connect to your FTP server. To determine whether or not your FTP server maintains a secure connection, you will initially attempt to connect to it using an anonymous user.
To connect to your FTP server, run the “ftp -p” command provided below. Simply replace “your-server-ip” with the actual IP address of your server.
ftp -p your-server-ipIf you attempt to sign in as an anonymous user, you will be presented with the following error notice. This output demonstrates that only your dedicated FTP user can access your server, which verifies that your FTP server is protected.
To close the FTP client, issue the “bye” command.
byeAs in step one, the “ftp” command below should be executed once more. however, sign in as your designated FTP user this time (user1).
ftp -p your-server-ipYou will receive a 230 Login successful message, which verifies that your FTP server functions as planned.
Execute the following commands to ensure the user1.txt file exists in the ftp/upload directory.
You created the user1.txt file in the “Creating a Dedicated User to Use the FTP Service” section (step five).
"# Change to the ftp/upload directory as the working directory.
cd ftp/upload
# List all files in the working directory.
Ls"
Execute the below get command to download the file (user1.txt) from your FTP server and store it locally.
get user1.txtBelow is a confirmation message stating that the transfer has been completed.
6-Next, execute the put command to upload the user1.txt file from your local machine to your FTP server as a new file named user2.txt.
put user1.txt user2.txt7-Finally, execute the “ls” command to list all files in the current directory and confirm that the user2.txt file was successfully uploaded.
LsIf the preceding file transfers were successful, you would see two text files entitled user1.txt and user2.txt, as seen below.
Disabling shell access
When you establish a new FTP user, your FTP server allows that user to log in automatically and execute the shell. In this way, in addition to uploading and downloading data, your users can run potentially harmful system instructions on your FTP server.
You can disable shell access to prevent SSH logins when you are not utilizing the FTP server. This is essential if you have enabled password-less login for your dedicated FTP user.
Open a second server terminal and enter the following command to “ssh” into the FTP server using the dedicated FTP user (user1).
ssh user1@fpt-server-ipUsing the user1 username and the password you created in the “Creating a Dedicated User to Use the FTP Service” section, you can successfully log in, as displayed below.
This shows that the user1 user can execute any command on your server, even reconfiguring the server. A hacked FTP user can cause significantly more harm than an anonymous user.
Execute the following command to generate a new shell script named “ftponly.sh” in the “/bin” directory of your FTP server. This script prevents your dedicated FTP user from logging in to your FTP server. This account is restricted to FTP access exclusively, the script then prints (echo) a warning message on the screen that reads.
echo -e '#!/bin/sh\necho "This account is limited to FTP access only."' | sudo tee -a /bin/ftponly .shRun the below chmod command to set the correct permissions on this new shell script (/bin/ftponly). This command makes the script executable and allows your FTP user (user1) to run it.
sudo chmod a+x /bin/ftponlyExecute the following command to add the path to the new shell script (ftponly) to the /etc/shells file. This operation assures that any attempt to log in with the user1 user is refused, as the /bin/ftponly script will instead be performed.
echo "/bin/ftponly" | sudo tee -a /etc/shellsExecute the “usermod” command below to convert your FTP user’s (ata) current shell to the /bin/ftponly shell.
sudo usermod ata -s /bin/ftponlyFinally, run the below command to SSH to your FPT server using your FTP user (user1).
ssh user1@fpt-server-ipConclusion
This article teaches you how to set up and configure an FTP server using VSFTPD on Ubuntu Linux. You’ve also learned how to configure an FTP user with restricted access and restrict shell access for an FTP user.
You should now possess a functional FTP server with restricted access.
With this knowledge, you may now configure your FTP server on AWS EC2 or begin setting up an FTP server on your Raspberry Pi. Which would you choose to work on first?
Don’t forget to monitor your FTP Server and Linux Server!